How do I complete a Year-End Close?
This FAQ article will assist you in performing the steps necessary to close a Fiscal Year.
![]() The steps outlined in this article must be performed for each NorthScope Company.
The steps outlined in this article must be performed for each NorthScope Company.
SUMMARY OF THE STEPS
Create the next Fiscal Year
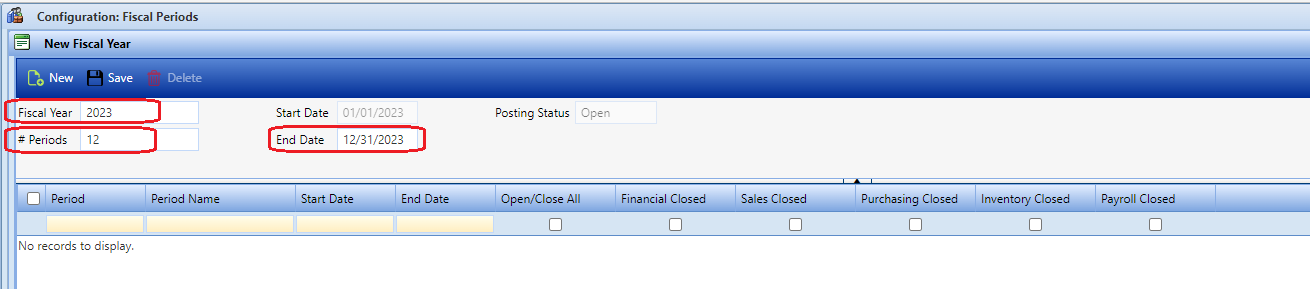
On or before the first day of a new Fiscal Year, the new Fiscal Year must be created by navigating to Financial → Configuration → Fiscal Periods and clicking the 'New' icon in the header toolbar. When the 'New Fiscal Year' page opens, verify that the following values are correct:
- Fiscal Year: This defaults to the "next" Fiscal Year and should not need to be edited. If this value is incorrect, make sure that the new Fiscal Year has not already been created.
- # Periods: This defaults from the # Periods on the last fiscal year and should not need to be edited unless changes are being made to your Fiscal Calendar.
- End Date: This defaults to one year from the last fiscal year's 'End Date' and should not need to be edited.
If all these values look correct, click the 'Save; icon to create the new Fiscal Year and new Fiscal Periods within the new Year. Once created, users can edit the 'Start Date' of any Period (except Period 1). Editing the 'Start Date of a Period will also set the End Date of the previous Period.
Image 1
Pre-close Checklist
Complete these steps before attempting to close a Fiscal Year.
- Ensure you have already created the next Fiscal Year (see steps above). If not, the message "You must add a new Fiscal Year before you can close the current year." will be displayed when you 'Validate' the Year End Close.
- Ensure any final adjusting entries are posted.
- Ensure that the last period of the current Fiscal Year has been successfully closed. If not, follow the steps to complete the Month End tasks.
- Ensure that all your GL Accounts have the correct 'Posting Type' assigned (Balance Sheet vs. Income Statement).
- Optional, but recommended:
- Print the Trial Balance report and save a copy.
- Print the Customer Aging report and save a copy.
- Print the Vendor Aging report and save a copy.
- Print the Fisherman Aging report and save a copy (if applicable).
- Print the year-end Financial Statements.
Running the Year-End Close
Once all the items identified on the pre-close checklist have been completed, the year can be closed. To run the 'Year-End Close' process:
- Navigate to the Fiscal Periods. Financial → Configuration → Fiscal Periods.
- Click the Year-End icon in the header toolbar and select "Year-End Close" to open to 'Year-End Close' window.
- When the 'Year-End Close' window opens, verify the following:
- The 'Retained Earnings Account' is correctly assigned. If not, add it.
- The year that you are closing is displayed (but not editable) in the 'Close Fiscal Year' text box. If not, you need to follow the step in the "Create the next Fiscal Year" section of this article.
- The last date of the Fiscal Year you are closing is displayed, but not editable, in the 'Closing Date' text box.
- Click the 'Validate' icon. If there are any errors, fix the issues identified and repeat steps 1-3. If there are no issues, the 'Validate' icon will change to a 'Process' icon. Click the 'Process' icon.
- You will see the message "The Year-End Close for [YearBeingClosed] has been successfully completed."
- Print the 'Beginning Balances' report and save a copy - optional, but recommended.
Reversing a Year-End Close
Reversing a Year-End close removes the Year-End Close journal entry and re-opens the Fiscal Year. If changes need to be made to a closed year, the 'Year End Close' for that year can be reversed. Once the 'Year-End Reverse' has been run, the missing transactions/adjusting entries can be entered and posted, and the 'Year-End Close' process can be re-run. This process of reversing a year-end close and re-closing can be run as many times as needed.
To run the 'Year-End Reverse' process:
- Navigate to the Fiscal Periods. Financial → Configuration → Fiscal Periods.
- Click the Year-End icon in the header toolbar and select "Year-End Reverse" to open to 'Reverse Last Year-End Close' window.
- When the 'Reverse Last Year-End Close' window opens, verify the value in the 'Last Year-End Close' textbox is the Year-End Close you want to reverse.
- Click the 'Reverse Last Year-End Close' icon in the header toolbar.
- You will see the message "The Year-End Reverse for [YearEndBeingReversed] has been successfully completed."